Inapp Inbox Notifications

Real-time Notification Center in React - Step-by-step Build Process for Developers

Anjali Arya
August 22, 2024
Learn how to build a real-time notification center in React, covering WebSockets, service workers, push notifications, and state management.
TABLE OF CONTENTS

Notifications are a fundamental part of modern web applications, offering users timely updates, alerts, and critical information. Whether it’s a social media notification, a new message alert, or a system warning, a well-designed notification center in React can significantly enhance user engagement.

In this post, we’ll guide you through building a real-time React notification center from scratch. We’ll cover creating a notification feed, managing real-time updates, and integrating with services like Firebase and APNs.

A good dev should build things from scratch.
But, why go through all this effort?
Besides the thrill of tackling a complex challenge and the satisfaction of crafting a fully customized solution, understanding the intricacies of notification systems can be incredibly valuable.
Plus, once you see how it all fits together, you might appreciate even more the convenience of platforms like ours, which simplify the process and offer advanced features without the heavy lifting.

1. Defining the Requirements for a Notification Center in React

Before diving into the architecture, it’s crucial to define what our React notification center needs to accomplish:

  • Real-Time Notifications: The notification feed in React should update in real-time without page refreshes.
  • Background Notifications: Utilize service workers to handle notifications in the background.
  • Multi-Channel Delivery: Support for in-app notifications, push notifications, emails, and SMS.
  • User Preferences: Users should be able to manage their notification preferences.
  • Scalability: The system should handle high volumes of notifications.
  • Reliability: Ensure that notifications are delivered promptly and without loss.

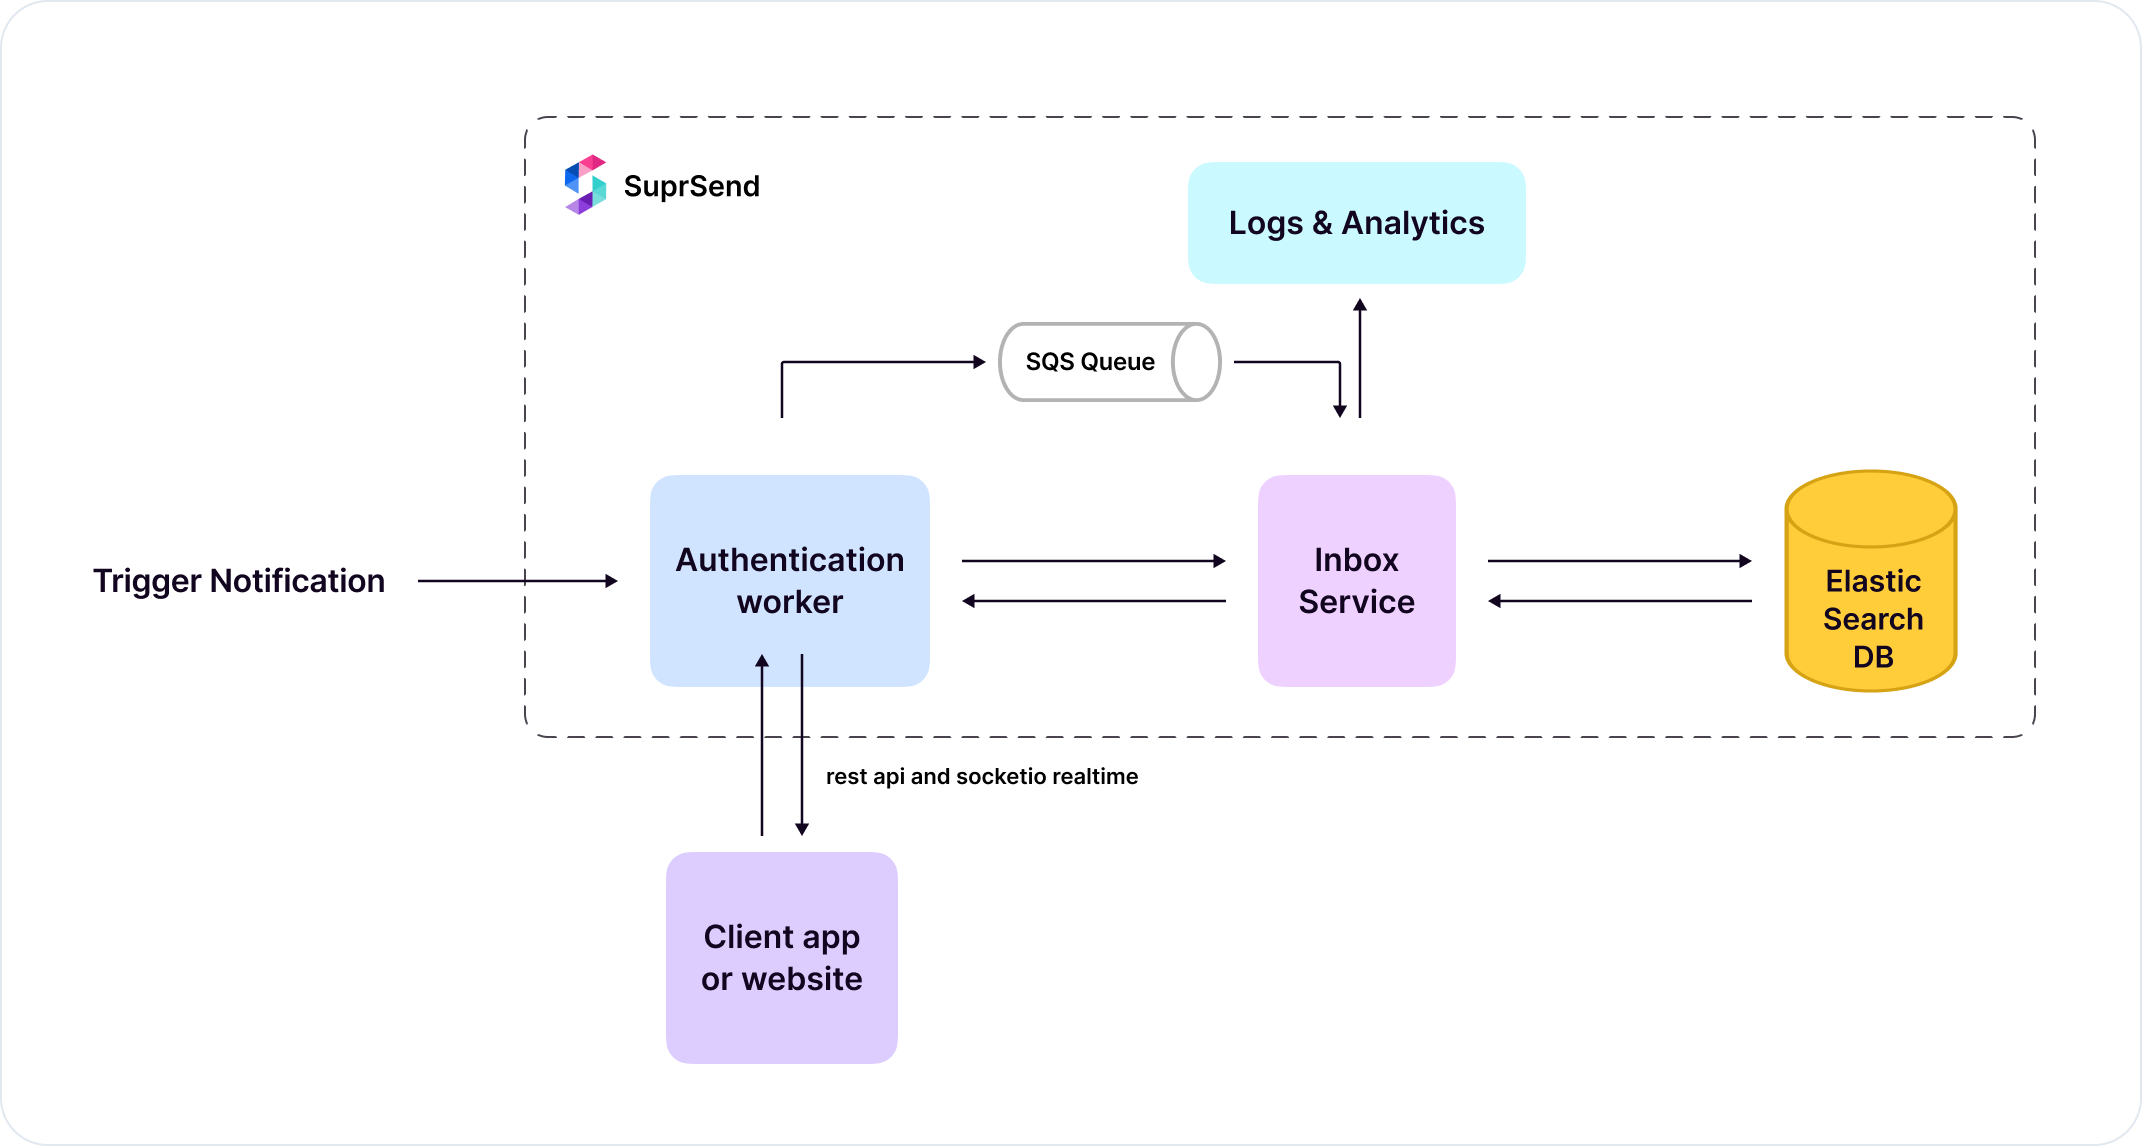
2. System Architecture Overview

Creating a robust React notification center requires careful planning of both frontend and backend components. Here’s a high-level overview of the architecture:

Frontend

  • React Application: The core UI of the notification center in React, displaying notifications and managing real-time updates.
  • Service Worker: Handles background notifications and integrates with the Notifications API for browser-level notifications.
  • WebSocket Connection or Polling: Ensures that the notification feed in React is updated in real-time.

Backend

  • Microservices-Based Backend: Responsible for generating, storing, and dispatching notifications.
  • Message Queue: Manages the distribution of notifications efficiently.
  • Database: Stores user preferences, notification logs, and delivery statuses.
  • Push Notification Services: Integration with Firebase Cloud Messaging (FCM) and Apple Push Notification service (APNs) for push notifications.

3. Backend Architecture for the Notification Center in React

The backend is the engine driving our React notification center. It’s responsible for generating, storing, and dispatching notifications to various channels.

3.1. Microservices Design

We’ll use a microservices architecture to ensure scalability and maintainability:

Microservice Functionality
Notification Service Generates notifications based on events (e.g., a new message, a friend request). Stores metadata.
Dispatch Service Dispatches notifications to channels (in-app, push, email, SMS). Uses a message broker for queuing.
User Preferences Service Manages user settings for notifications (e.g., preferred channels, do-not-disturb hours). Provides API.

3.2. Database Design

A well-structured database is crucial for storing notification data:

  • Notifications Table: Stores metadata about each notification (e.g., type, content, status).
  • User Preferences Table: Tracks user-specific settings (e.g., preferred channels, notification types).
  • Logs Table: Keeps a log of all dispatched notifications for auditing.

Example: Notification Service in Node.js/Express

 
    // Notification Service Example using Node.js and Express

    const express = require('express');
    const app = express();

    // Simulated Database
    let notifications = [];

    app.post('/notify', (req, res) => {
        const notification = {
            id: notifications.length + 1,
            type: req.body.type,
            message: req.body.message,
            userId: req.body.userId,
            status: 'unread',
            timestamp: new Date()
        };

        notifications.push(notification);

        // Trigger dispatch service here
        // ...

        res.status(200).send(notification);
    });

    app.listen(3000, () => {
        console.log('Notification Service running on port 3000');
    });


4. Real-Time Communication: WebSockets vs. Polling

To keep the notification feed in React updated in real-time, we can use WebSockets or fallback to polling.

4.1. WebSocket Connection

A WebSocket connection allows for persistent, two-way communication between the client and server:

  • WebSocket Server: Handles incoming connections and broadcasts new notifications to connected clients.
  • Client Integration: The React frontend listens for WebSocket messages and updates the notification center in real-time.

Example: WebSocket Server using Socket.IO

 
    // WebSocket Server Example using Socket.IO

    const io = require('socket.io')(3001);

    io.on('connection', (socket) => {
        console.log('User connected:', socket.id);

        // Send notification to the client
        socket.emit('notification', {
            message: 'You have a new notification',
            timestamp: new Date()
        });

        socket.on('disconnect', () => {
            console.log('User disconnected:', socket.id);
        });
    });


Client-Side WebSocket Integration in React

 
    import React, { useEffect, useState } from 'react';
    import io from 'socket.io-client';

    const socket = io('http://localhost:3001');

    function NotificationCenter() {
        const [notifications, setNotifications] = useState([]);

        useEffect(() => {
            socket.on('notification', (notification) => {
                setNotifications((prevNotifications) => [...prevNotifications, notification]);
            });
        }, []);

        return (
            

Notification Center

    {notifications.map((notif, index) => (
  • {notif.message} - {notif.timestamp}
  • ))}
); } export default NotificationCenter;

4.2. Polling as a Fallback

In environments where WebSockets may not be available, polling can serve as a fallback:

  • Polling Mechanism: The client periodically sends requests to the server to check for new notifications.
  • Efficiency Considerations: Although less efficient than WebSockets, polling ensures compatibility across different environments.

Example: Polling Implementation in React

 
    import React, { useEffect, useState } from 'react';

    function NotificationCenter() {
        const [notifications, setNotifications] = useState([]);

        useEffect(() => {
            const interval = setInterval(() => {
                fetch('/api/notifications')
                    .then(response => response.json())
                    .then(data => setNotifications(data));
            }, 5000); // Poll every 5 seconds

            return () => clearInterval(interval);
        }, []);

        return (
            

Notification Center

    {notifications.map((notif, index) => (
  • {notif.message}
  • ))}
); } export default NotificationCenter;

5. Integrating the Notifications API and Service Workers

Service Workers and the Notifications API are crucial for handling notifications in the background and at the browser level.

5.1. Service Workers

Service Workers enable background processing, allowing notifications to be received and displayed even when the app isn’t in the foreground:

  • Registration: Register a Service Worker in your React app to handle push notifications.
  • Background Tasks: Manage background notification tasks, such as handling clicks and custom actions.

Example: Registering a Service Worker in React

 
    // Registering Service Worker in React

    if ('serviceWorker' in navigator) {
        navigator.serviceWorker.register('/sw.js').then(function(registration) {
            console.log('Service Worker registered with scope:', registration.scope);
        }).catch(function(error) {
            console.error('Service Worker registration failed:', error);
        });
    }


5.2. Notifications API

The Notifications API allows you to display system-level notifications directly from the browser:

  • Permission Handling: Request permission from users to display notifications.
  • Triggering Notifications: Use the API to show notifications even when the user isn’t actively using the app.

Example: Displaying a Notification using the Notifications API

 
    // Triggering a Notification with the Notifications API

    if (Notification.permission === 'granted') {
        new Notification('You have a new message!', {
            body: 'Click to view the message.',
            icon: '/path/to/icon.png'
        });
    } else if (Notification.permission !== 'denied') {
        Notification.requestPermission().then(permission => {
            if (permission === 'granted') {
                new Notification('You have a new message!', {
                    body: 'Click to view the message.',
                    icon: '/path/to/icon.png'
                });
            }
        });
    }


6. Push Notifications with Firebase and APNs

For mobile and desktop push notifications, integrating with Firebase Cloud Messaging (FCM) and Apple Push Notification service (APNs) is essential.

6.1. Firebase Cloud Messaging (FCM)

Firebase provides a robust platform for sending push notifications:

  • FCM Setup: Register your app with Firebase and obtain the necessary tokens for push notifications.
  • Sending Notifications: The backend service uses these tokens to send notifications to specific devices.

Example: Sending Push Notifications with FCM in Node.js

 
    const admin = require('firebase-admin');
    const serviceAccount = require('./path/to/serviceAccountKey.json');

    admin.initializeApp({
      credential: admin.credential.cert(serviceAccount)
    });

    const message = {
      notification: {
        title: 'New Notification',
        body: 'You have a new notification in your app!'
      },
      token: 'device-token' // Use the actual device token here
    };

    admin.messaging().send(message)
      .then(response => {
        console.log('Successfully sent message:', response);
      })
      .catch(error => {
        console.error('Error sending message:', error);
      });


6.2. Apple Push Notification service (APNs)

APNs is necessary for iOS devices:

  • APNs Integration: Handle device tokens securely and use them to send notifications via the APNs gateway.

7. Building the Notification Center UI in React

The notification center in React should provide an intuitive and responsive user interface that handles real-time updates and user interactions.

7.1. Designing the Notification Feed in React

Key components of the React notification center include:

  • Notification List: A dynamic list displaying all notifications, with options to mark as read/unread, delete, etc.
  • Notification Badge: A visual indicator showing the number of unread notifications.
  • Toast Notifications: Use libraries like react-toastify for ephemeral notifications that appear briefly and then disappear.

Example: Notification List Component in React

 
    import React from 'react';

    function NotificationList({ notifications }) {
        return (
            
    {notifications.map(notification => (
  • {notification.message}
  • ))}
); } export default NotificationList;

Example: Using react-toastify for Toast Notifications

 
    import { toast } from 'react-toastify';
    import 'react-toastify/dist/ReactToastify.css';

    toast.configure();

    function notify() {
        toast('New notification received!', { 
            position: toast.POSITION.BOTTOM_RIGHT 
        });
    }

    notify();


7.2. Managing State with Redux or Context API

Effective state management is crucial for keeping the React notification feed in sync:

  • Global Notification Store: Use Redux or Context API to manage the state of notifications globally across your app.
  • Real-Time Updates: The store should be updated in real-time as new notifications arrive via WebSocket or polling.

Example: Managing Notification State with Redux

 
    import { createSlice } from '@reduxjs/toolkit';

    const notificationSlice = createSlice({
        name: 'notifications',
        initialState: [],
        reducers: {
            addNotification: (state, action) => {
                state.push(action.payload);
            },
            markAsRead: (state, action) => {
                const notification = state.find(n => n.id === action.payload);
                if (notification) {
                    notification.read = true;
                }
            }
        }
    });

    export const { addNotification, markAsRead } = notificationSlice.actions;
    export default notificationSlice.reducer;


Conclusion

A good developer should definitely take on the challenge of building a notification system from scratch to hone their skills.

But if you're racing against the clock, juggling a tight deadline, or just dreaming of a vacation (or simply need a break), give SuprSend a try.

Our tool makes life easier with ready-to-use components and a seamless notifications API.

So while we handle the heavy lifting, you can kick back and relax. 🌴🚀

Nevertheless, build!

Written by:
Anjali Arya
Product & Analytics, SuprSend
ABOUT THE AUTHOR

What’s a Rich Text element?

The rich text element allows you to create and format headings, paragraphs, blockquotes, images, and video all in one place instead of having to add and format them individually. Just double-click and easily create content.

Static and dynamic content editing

A rich text element can be used with static or dynamic content. For static content, just drop it into any page and begin editing. For dynamic content, add a rich text field to any collection and then connect a rich text element to that field in the settings panel. Voila!

How to customize formatting for each rich text

Headings, paragraphs, blockquotes, figures, images, and figure captions can all be styled after a class is added to the rich text element using the "When inside of" nested selector system.

Implement a powerful stack for your notifications
By clicking “Accept All Cookies”, you agree to the storing of cookies on your device to enhance site navigation, analyze site usage, and assist in our marketing efforts. View our Privacy Policy for more information.